I am loving on the colors seafoam green and red together. I have a big red wall in my living room and I've decided to make the accent color seafoam green. Hence, the birdie I made earlier.
2/26/10

2/24/10
Spiced-Up Tea Towels
I love the ideas from Ashley's makeitandloveit blog. She posted about dressing up plain-old tea towels to match your kitchen. I made these for my good friend Kim's bridal shower. Her kitchen will be red, tan and black.
Here's how to:
Cut a 2 1/2 inch strip of fabric - measure the width of your tea towel and cut length of fabric 1 inch longer (length-wise)
Iron your fabric edges over 1/4 inch around entire perimeter.
Place on tea towel and fold 2 edges around the back side of tea towel.
Stitch 1/4 inch seam around entire strip.
Embellish with buttons, yo-yos's, applique, et.
(Yep, there's that fabric yo-yo showing up again. :)

2/23/10
Nursery Makeover Part 2: Orange Curtain
My sweet mom made a cute valence curtain that I followed the basic pattern of to make this orange curtain.
Here's how to if you want to try it yourself:
Cut out 2 equal lengths of fabric. Mine each measured 22" x 50" (you could make it shorter if you like, it will just affect how 'bunchy' the valence is)

Place both pieces right side together and sew 1/2 inch seam along width edge to make one long piece of fabric. (Once put together, mine measured roughly 22" by 99")

Iron open the seam you just made. Then, stitch a 1/4 or 1/2 inch seam around entire piece of fabric.

Fold over one length of the fabric 3 1/2 inches. Stitch along the bottom of this fold. THen, Stitch another seam 2 inches closer to the folded edge. This gives you a space to put your curtain rod through.

Quick and easy way to add a splash of color.

2/22/10
Cute in just a white onsie.
Baby shower present, anyone? These are so simple to make and are so darling. I know you can find these onsies everywhere on etsy, boutiques, etc., but here's how I made them.
This first one doesn't even require a sewing machine and I think it's my favorite. (Sorry these first two pictures look a little pink - they are in fact white onesies).
So, I found this tutorial for fabric yo-yo's here. It is a great tutorial and makes more sense than I could by trying to explain it. Check it out if you want to try them out. (I now embellish all sorts of things with these yo yo's: headbands, brooches, cards, cork boards, et.)
For this project, I made a yo-yo, then just stitched a button in the middle of it to hold it in place. So simple!

This one is just 2 misshapen squares stitched on top of each other.

The elephant. Honestly, to make these animals, I just googled images of 'elephants' 'frogs' girraffe' etc. I printed them out, then cut out the silhouette, traced it onto the wrong side of the fabric (with applique ironed on). Then, I cut out my traced image, ironed it onto the onsie and simply stitched around the edge. I did just a straight stitch, not zig-zag because I kind of like the frayed/homemade look once it's washed.

I don't know what this is.. apple? flower? any other guesses? It turned out cute anyhow.

Flower.

2/19/10
Nursery Make-Over Part 1
I've decided to make my nursery more exciting by adding more color! Currently it is green, yellow and brown. There's nothing I can do about the white walls (renting), so I need more color accents. I decided on the colors green, blue, and orange.. then I came across this great picture atapunchofcolor blog. I'm definitely a big fan of the color combination.

2/18/10
Paper Flower Craft
I learned how to make torn paper flowers at littlebirdiesecrets.com. I used them on some of my Valentine's cards, scrapbooking pages, even framed home decor - super cute. I've pretty much been putting them everywhere since I learned how. My family is now surrounded by them. They are the easiest embellishment to make!
How to:
Basically, you cut out 3-4 different sizes of paper circles.
Crumple them up into little balls (antique-ink the edges if you want)
Flatten them out again and stick a brad/eyelet through the center.
Done! I added little rhinestones onto the leaves of the stem on this one.

2/17/10
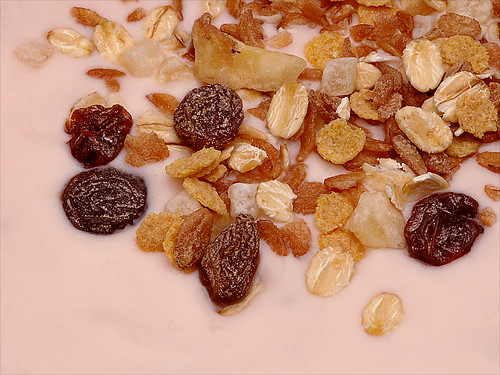
Helpful hint - baking with raisins
Did you know???
I just discovered something amazing. If you are planning on baking anything in the near future with raisins in it-- make sure you soak the raisins in water first! It makes them plump and juicy! Forgive me if that is already common knowledge -- I just made oatmeal raisin cookies, with pre-soaked, delicious raisins. It makes all the difference.

Boy Nursery
I can always find greatest ideas for little girl nurseries.. not helpful when you have a boy! I think these art pieces found here would make perfect boy nursery decor.


I'm going to try my hand at it.. stay tuned for the results :)
2/16/10
'Owl' Love You Forever
Our good friends Amy and Toby's owl-themed wedding reception was one of the most unique I've seen. They were married last May, only a week or so before I was due. I was humongous, but luckily everyone was paying more attention to the decor than the plump guest.
It was gorgeous. In love with the turquoise, orange and yellow color combination. Amy says that she has a plethora of Owls in her home decor, now. If any of you know her, don't purchase her any more owls :) She is at maximum capacity.
Here are some of my favorite pics from their reception:


Photos by Jason McGrew
2/15/10
Crocheted Hand Warmers
January and February are my least favorite months of the year. I feel like they are so long and cold... especially this year, since I'm staying home with a baby with no vehicle to escape (not from the baby, with the baby). So, in order to keep my sanity, I developed some new skills. If you know how to knit or crochet (or even if you don't, You Tube is a great teacher), you have to visit the Creative Yarn blog. That's where I learned how to make these lovelies. They really do keep my hands warmer, and they dress up a mug of hot chocolate or cider really well!

2/13/10
Sugar Cookie Delight
Deliciousness is:

I found this great recipe here, but made a couple changes:
- 1/2 cup butter, softened
- 1 cup granulated sugar
- 1/2 cup sour cream (fat free was okay to use)
- 2 eggs
- 1/2 teaspoon vanilla
- 3 1/2 cups flour
- 1 teaspoon baking powder
- 1/2 teaspoon baking soda
- 1/2 teaspoon salt
- Frosting, sprinkles, colored sugar, decorations
Beat together butter and sugar. Add sour cream, eggs, and vanilla; beat well. Stir in flour, baking powder, baking soda, and salt. Mix well. Cover and refrigerate at least one hour.
Pre-heat oven to 350 degrees F
Roll dough out on a lightly floured surface to 1/4 inch thickness. Dip cookie cutters in flour then cut dough into desired shapes. Place cookies 1-inch apart on un-greased cookie sheet. Bake for 8-10 minutes (cookie will be a very light tan on bottom - tops will still be pale). Remove to wire cooling rack. Frost when cooled.
Butter Cream Icing:
- 2/3 cup butter, room temperature (I used Country Crock light margarine and it worked pretty good)
- 4 cups powdered sugar
- 1/4 teaspoon salt
- 1 teaspoon vanilla or almond extract
- 2 tablespoons cream or milk
- gel or paste food coloring
Beat together, adding more milk or powdered sugar to desired consistency.
2/12/10
So simple scrapbook page
Don't you love this scrapbook page? It is simple and elegant. The picture is adorable, but I love the typewriter font and how she stitched on a couple of random fabric pieces. Fantastic.
2/10/10
Crafting with books
Kristine McKay has so many cute crafty ideas. I came across her segment on 'crafting with old books' and had to try. I was SO EXCITED about the outcome. Currently, the topiary sits on our master bedroom desk, and the wreath hangs above our headboard. 
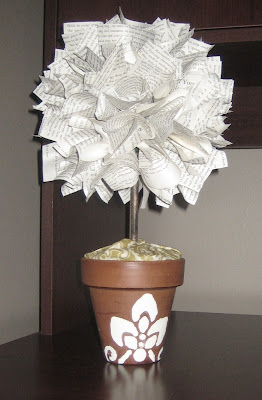

These two things make me so happy every time I'm in the room! They were super easy (a bit time-consuming). They turned out so great and were so inexpensive! My sister Lindsay also tried it out and loved the outcome. She used a green styrofoam wreath and decided to spray paint it brown first before stabbing her paper into it, just in case you could see through the pages a bit.
Check out the link for more detailed instructions, but here's how to:
Buy a styrofoam wreath from Roberts Crafts/Joannes/etc
Rip out all the pages from a 250-page book (250 individual pages - so the book actually had 500 pages of reading)
Cut off all margins
Stab the styrofoam to make a hole with a somewhat pointy pen (with lid on). Then, place the pen in the center of a single page and wrap the paper around the pen.
Dab a bit of hot glue, styrofoam or gorilla glue on the paper and stick it in the hole you made. Repeat around the wreath.
I made the topiary the same way, then glued some fabric on the base and stenciled the pot.
2/9/10
Valentine's Day Craft
I saw this darling idea for a Valentine's Day craft on KSL's Studio 5. I decided to try it out and it turned out great! Also a fun activity to do with kids.

Here's a quick run down of how to make it:
Find two coordinating paper colors (I did light pink and gray).
Cut out a cute heart shape and glue it onto the 8x10 cut out (I antique-inked the edge of the heart cut-out).
Glue on random small shiny, pink, red, black things you have around your house (paper clips, buttons, clothes pins, ribbon etc.) I found Krazy Glue to be the best adhesive for the little items like sequins and small beads. Click on the picture to get a better view.
Sand and paint the frame antique white. Viola! Happy V-Day!
2/7/10
Modern Birdie Fabric Craft
I found this amazing picture on my friend Heather's blog. I LOVED it. With the fabric scraps I had, I made my own rendition that now sits on our fireplace mantle.


Here's how I did it:
First, I printed a picture of the birdie image, then I cut out the birdie.
I ironed on some steam-a-stitch/wonder under/stitch-witchery onto my red fabric, traced the birdie and cut.
Peeled back the steam-a-stitch and ironed onto the polka dot fabric. Then I zig-zag stitched around the edges.
I also cut out the little feathers for the tail and adhered them the same way with the steam-a-stitch and zig-zag stitch.
I cut out 3 circles (rough cut - not perfect circles - cuter that way) of differing sizes and just did a straight stitch around the circumference to make the "wing".
I sewed a button on for the eye, then mod-podge adhered the whole thing onto an 8x10 cut out of a cereal box so it would lay taught in the frame.
Super easy and fun!
Welcome to my blog! I've decided to document the more wonderful things in life, making more or less a portfolio of the things I consider to be brilliant, inspiring, creative, etc.
to cause to come into being,
as something unique
that would not naturally evolve
or that is not made by ordinary processes.
"The desire to create is one of the deepest yearnings of the human soul. No matter our talents, education, backgrounds, or abilities, we each have an inherent wish to create something that did not exist before. Everyone can create. You don’t need money, position, or influence in order to create something of substance or beauty. Creation brings deep satisfaction and fulfillment. We develop ourselves and others when we take unorganized matter into our hands and mold it into something of beauty." - Dieter F. Uchdorf
So much of being creative is really just re-organizing another's work to make it your own. Embrace it. My creative juices flow when I am inspired by something I see or hear. Hopefully you too can be inspired by what you see here.
Be brilliant in your own way!
Subscribe to:
Posts (Atom)


